How to Install and Terminate Cat7 Ethernet Cables: Step-by-Step Guide
Author: Michael Publish Time: 06-08-2025 Origin: Site
■ Cat7 Ethernet Cable Installation and Wiring Guide
Acclamation Algorithm, Computer Use, and Best Practices
The Cat7 Ethernet cable is even superior, boasting a maximum transfer speed of 10 Gbps over shielded twisted-pair (STP) cabling for enhanced performance up to 600 MHz. However, these approaches must be applied appropriately to achieve the full potential of this cable's performance.
■ Terminal Management: Checklists for Connectors and Compatibility
Connector Type:
When it comes to Cat7 cables, most of the time we find GG45 (GigaGate45) or Tera connectors, which are used for higher frequency shielding, although the RJ45 connector remains popular, many shielded Cat7 cables can still be found with RJ45 connectors, which also support backward compatibility.
Shielding Considerations:
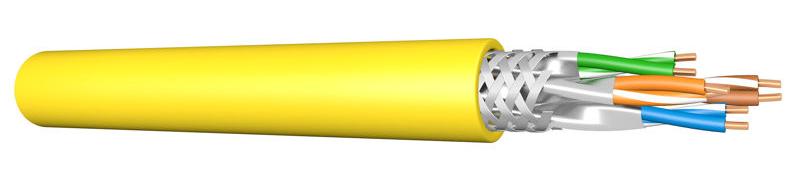
The Shirify and FTP type owe their preferred significance to Cat7 technology. S/FTP means that there are individually shielded twisted pairs as well as an overall foil or braid shield. In the course of termination:
Maintain shield continuity to minimize EMI/RFI emissions.
Shielded keystone jacks, along with patch panels, are required.
Guaranteed 360° ground contact in connectors.
Recommended Tools:
Flexion of wires with equipment having glass yokes
Crimping tool for shielding RJ45s
An ohmmeter with shielding detection
■ Installation Method: Step-by-Step
Measure and Cut
Determine the cable-by-measuring requirement. Apply a gentle bend where necessary (minimum bend radius: 4× cable diameter).
Stripped and Cabled
Use a knife to remove the outer sheath to a length of about 5 cm (2 inches).
Retain the shielding foil and have it shifted to fit, with the adjacent pairs of wires aligned together.
Expose the drain wire and make a tight ground if you have one.
Terminate the Cable
Arrange wires in the T568A or T568B wiring standard (T568B is most common).
Insert wires into a shielded RJ45 plug or GG45 plug, ensuring they make contact with the shields.
Crimp the connector using a shielded cable crimper.
Grounding
Connect the shielding/drain wire to the grounding system at both ends of the run if required by your system design.
Test and Label
Use a network cable tester to verify pinout, shielding, and signal integrity.
Label both ends for easier maintenance.
■ Usage Recommendations
Use Environment:
Perfect for data centers and other backbone connection locations, with high-speed transmission and noise immunity, as well as for intelligent buildings that require this level of immunity.
Cable Routing:
Avoid running parallel to other cables or wires carrying power.
Add cable trays with ducts to ensure there are no bends in the cable or wires.
Patch Cords and Cross Connections:
Use Cat7-rated patch cords at the very least, or ensure they are backwards compatible with Cat6A/Cat6 when needed.
Distance Limitation:
For horizontal cables, do not exceed 90 m (90 m + 10 m patch).
■ Common Mistakes to Avoid
Improper shield grounding leads to signal loss or EMI leakage.
Using unshielded jacks or patch panels.
Kinking or bending the cable too tightly.
Overstripping may compromise shielding.
■ Conclusion
Correct, done. In terms of terminations for Cat7 Ethernet cables, they are essential for maximizing their capabilities. Secure the shield, select compatible connections, and apply structured cabling standards to create a high-performance, open, high-speed network structure.
Contact us for more information

michael@zion-communication.com
+86 13757188184


